Studio711.com – Ben Martens

Home Improvement

Flume Smart Home Water Monitor Review

A few weeks ago, I watched an Ask This Old House video about laundry room leaks. A few days later, a coworker had to rush home because one of his washer water supply hoses had sprung a leak. This is something I already think about from time to time and I was finally prompted to take action.

The first step was replacing my rubber hoses with some nice braided hoses. I made sure to get specific high efficiency hoses that could supply water quickly enough to our washer. Our existing hoses were ~10 years old so it felt good to replace them.

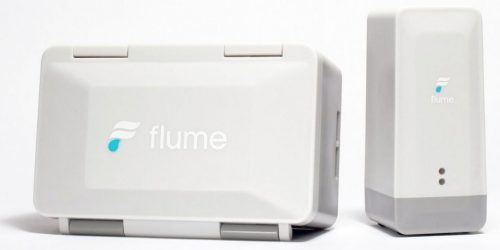
But that only helped the washer. What about the ice maker supply line? Or the various toilets? I thought about getting a bunch of water sensors and having them around the house, but Tim mentioned the smart meter from Flume Water. After a little research, I was hooked and thanks to the magic of Amazon Prime, it was on my doorstep when I woke up the next morning.

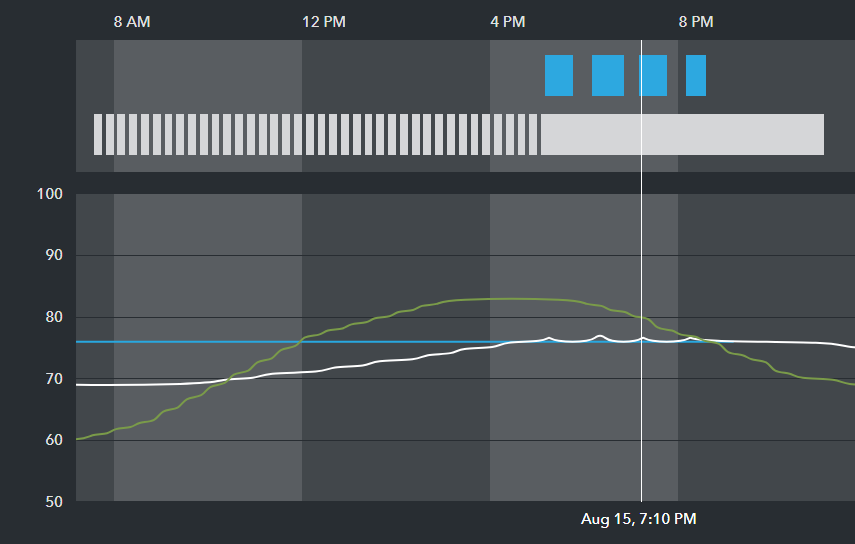
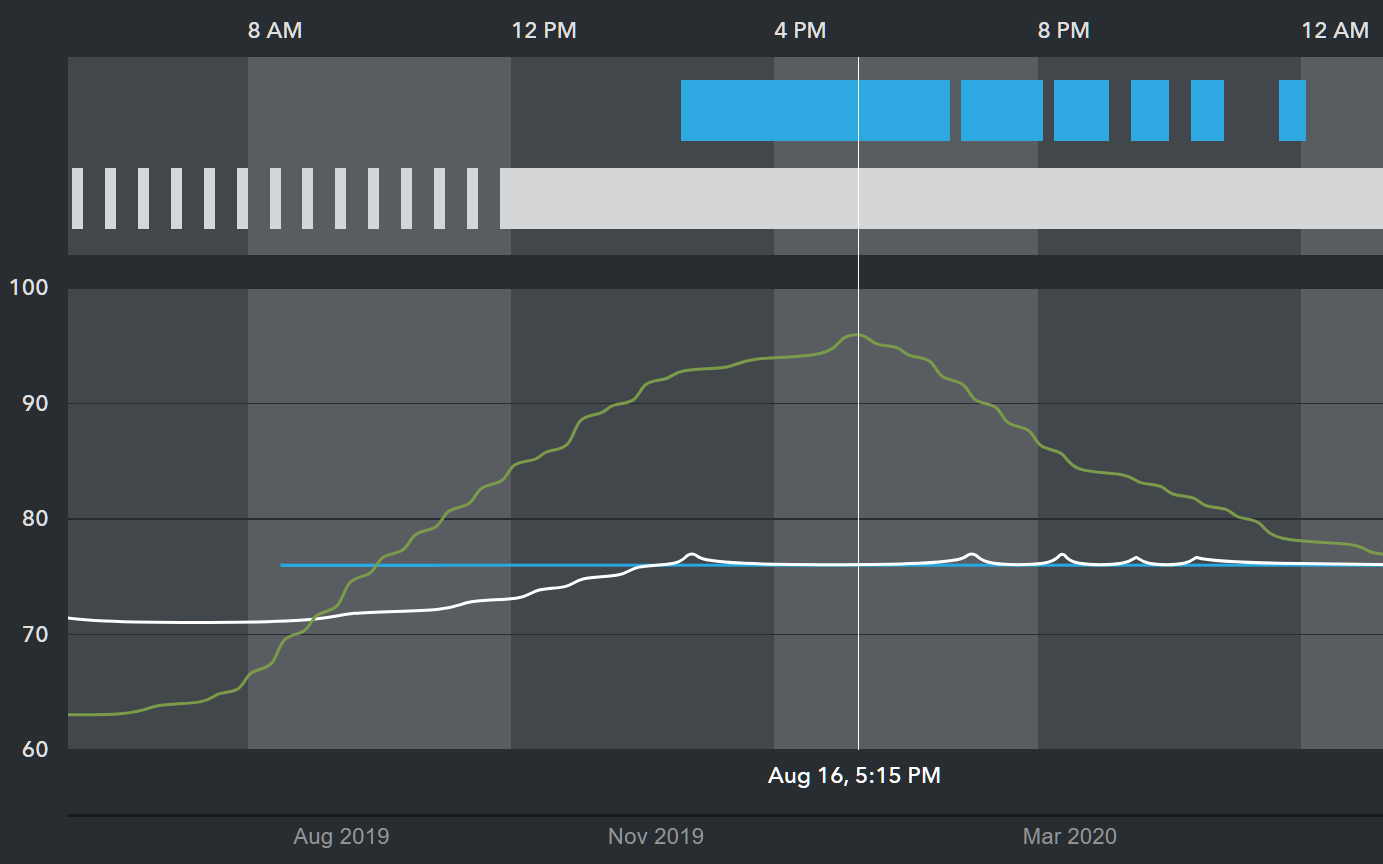
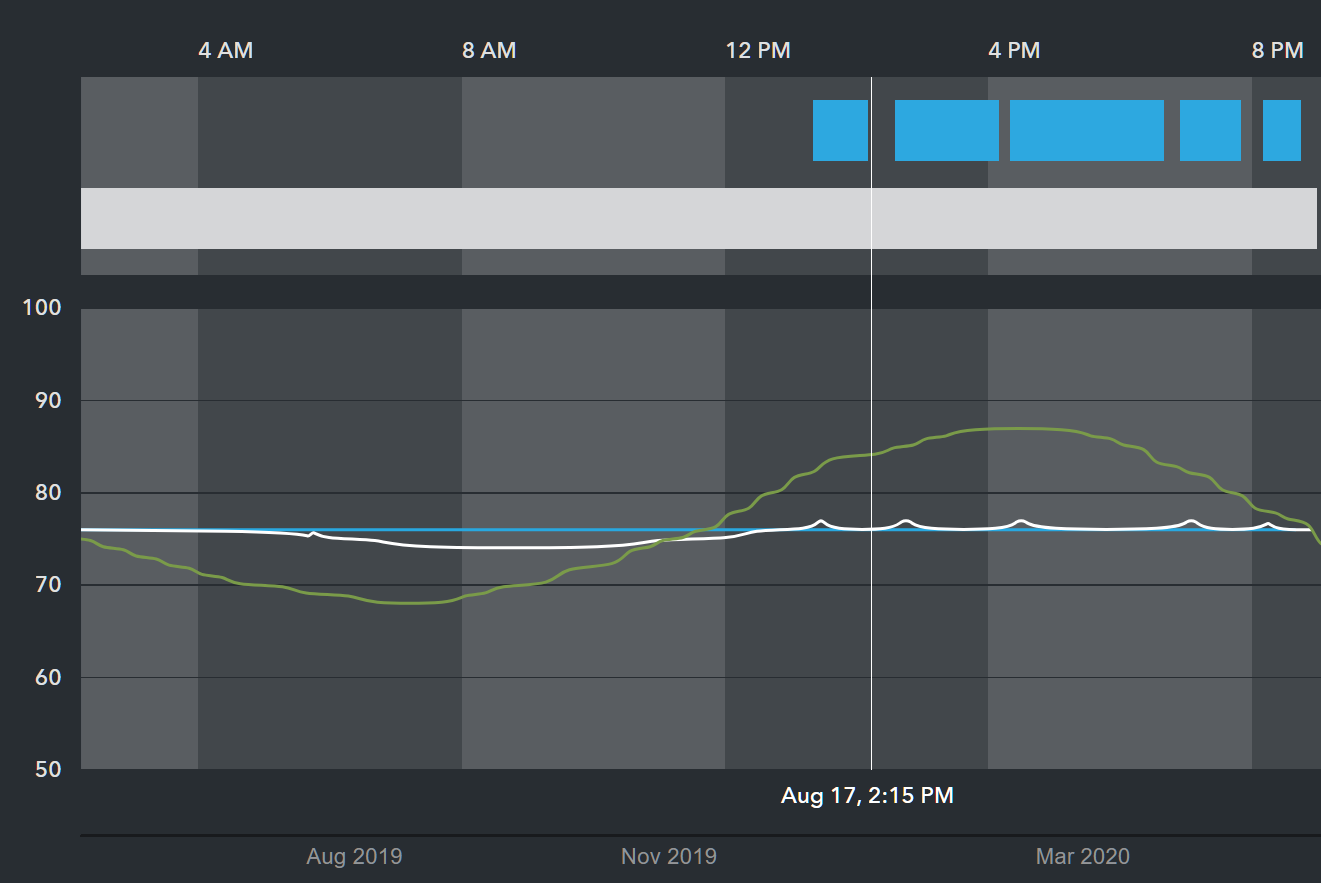
The box strapped on to my meter. It just sits next to the meter. No plumbing is required. Most meters work with a magnet that spins as the water flows so this device can read that magnetic field and understand how much water is flowing through. That connects to a WiFi bridge in the house and from there the data gets sent to Flume where it feeds the app on my phone. I can now get minute by minute water usage reports and I can set up rules for alerting me to water leaks. For example, any water that runs for more than 2 hours will send me an alert, or if I have water flowing at more than 6 gallons per minute for 15 minutes, I’ll get an alert. It’s not as nice as the systems that will automatically shut off the water, but it’s considerably cheaper and I have enough neighbors that I could call to have them shut off my water if I wasn’t home.

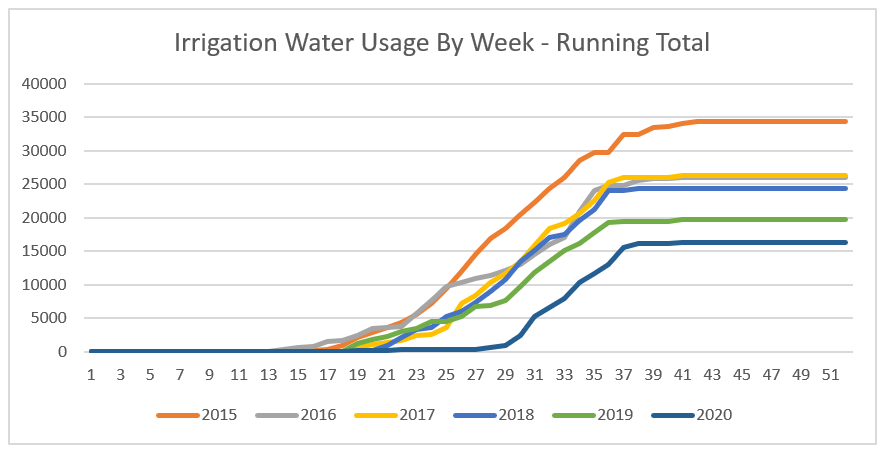
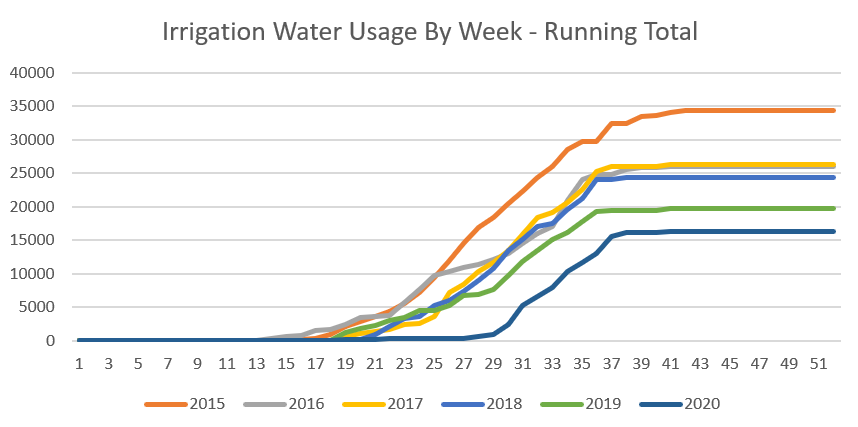
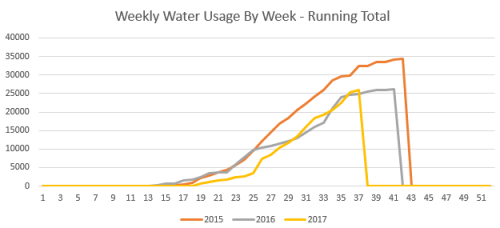
Most people would stop there, but Tim also mentioned that some irrigation systems will integrate with Flume to detect abnormal usage. I realized I could set that up myself because I’m already pull data from my OpenSprinkler irrigation controller and the Flume device has an API as well. Before too long, I had a program written that would know what zones were watered at each period of the night, look at the total amount of water they consumed, and alert me if there are any oddities. Last year I had a broken irrigation head right near the drain in the curb so I didn’t notice the water dumping down the drain until I got a higher than normal bill. With this setup, I would have known the first morning after that happened.

Even without the geeky add-on, it’s still a pretty neat device. It’s one of those things that probably isn’t worth it if you never have a leak, but if you do, it will pay for itself a thousand times over and the peace of mind is worth something too. Also, I now know that it costs about 2.5 cents to flush a toilet.

Utility History

I like to collect data. It’s rarely interesting at a single point in time, but over the years, it can provide insights or show trends that I didn’t know existed.

For example, my irrigation controller is based on a Raspberry Pi. There’s a webpage for it and it has an API so I can download the actual runtime of each zone. I’ve measured the amount of water used for a minute in each zone (by watching my water meter) so I can get a rough estimate of how much water I’m using through the system overall. Some of the variability is due to the weather, but I’ve also been tweaking the algorithm to automatically adjust the watering schedules based on the forecast.

I have a similar logging system for my HVAC. I haven’t been successful in reducing these costs much as I think I had it pretty optimized to begin with.

So yes, this is geeky, but it’s also frugal. Two things that are super attractive, right?

Yard Watering

My sprinkler controller is an Open Sprinkler model and I wrote a program which periodically pulls the logs off it and stores them in a database. I was checking out my yearly irrigation water usage and noticed that I’m generally getting better every year about keeping the yard alive with less water. Obviously this is heavily weather dependent, but generally our summers are exceedingly dry so the main variation is in the start and stop of the watering season.

The y-axis roughly equates to the number of gallons used but this is far from accurate. The year to year comparisons are completely valid though.

I have similar data showing my HVAC (furnace, AC and fan) usage over the years but I’ll save that for another time. I don’t want to pack too much excitement into a single post.

Saving Money Is Cool

I’m very thankful that we added air conditioning to this house. This last Sunday it was in the mid-90s and we burned that sucker all day long. But I’m also a cheapskate at heart. I haven’t yet figured out exactly how much energy it consumes, but it’s far from free to run so I try to use it as little as possible. Here’s our basic strategy if it’s going to be warm:

  • Leave windows open the night before to cool the house down as much as possible.
  • In the morning, leave the windows open until it’s the same temperature inside as it is outside. Then close every window and close all of the blinds on the south side of the house. Turn on the AC.
  • In the evening, once the outside temp is the same as the inside temp, turn off the AC and open everything up to get free cooling from outside.
  • Run the house fan to keep the air circulating. Our vents pump more air downstairs than upstairs (they were designed for heating) so even just running the fan can cool it off upstairs.

We are PacNW wimps so we run the AC if it’s 80 or higher and we have it set to keep upstairs at 76 degrees. Our EcoBee thermostat supports multiple thermostats which is really handy in situations like this. It also has an API so I can connect to it and pull data off. I have logs of the indoor temp from each sensor along with the outdoor temp so I wrote a quick program that helps us remember when we should close the windows or open them back up. Now we get a text reminder when we need to make changes to the windows/blinds.

Here’s an example of what it looks like on a day that got up to 84 degrees. The night before, it got down to 59 degrees outside and inside it got down to 69. Around 10:30, the outside temperature got up to the same as the inside temp so we shut the windows, closed the blinds and turned on the AC. The house coasted until 5pm before the AC finally kicked on a few times until 8:30 when we shut it off and opened the windows.

Here’s a comparison to show how much of a difference this strategy can make: On Sunday, it got up to 96. By cooling the house down a lot the night before, the AC didn’t kick on until 2:35.

That night it stayed very warm so I never opened the windows until 6:30am when I got up. The house barely cooled off at all before I had to shut things up again. Monday only got up to 87 but the AC ran almost exactly the same* amount of time as the day before!

This works really well around here because even on hot days, we get a “marine push” that brings cool winds in the evenings. Another key is that we have low humidity so I only remember one or two days where we ran the AC more than normal because of high humidity.

* On Monday, I shut the AC off at 8:40pm. So to compare the two days, I took all of the AC usage up until 8:40pm on both days. Sunday’s usage was only 20 minutes less than Monday’s usage even though it was 10 degrees warmer.

Siding, Windows and Paint

Our house was built in 1990 and had the dreaded Louisiana Pacific siding. (Detailed explanation from a home inspector site.) The siding was only warrantied for 25 years and when you throw in the major defects in the design, we had large areas of our house that were really bad. We also needed new paint so it seemed like a good time to bite the bullet. Some of our neighbors have done partial replacements of the bad areas, but we’re hoping to be in this house for quite a while and I don’t like future problems looming over me, so we decided to do it all at once. We ended up going all out and adding full window replacement to the job as well. It really increased the total price, but it’s cheaper to do it at the same time as the siding versus doing it later. The windows were original too and we had a tough time even opening some of them, not to mention dealing with mold from all the moisture that accumulated inside, etc.

It’s hard to even get a contractor to call you back, but I got two bids and chose the lower priced one because multiple neighbors had a good experience with him. The job was supposed to start the first week of April and finish mid-May. The actual job started in early May and finished in … August. Ouch. We had a dumpster and port-a-potty in our driveway for a very long time. They say a job has three levers: quality, schedule and price. You get to pick two. Price and quality were our top concerns and that’s what we got. I’m very thankful to the contractor for not cutting corners when our job took way longer than expected.

If you drive past, you probably don’t notice much different about the siding (except that it’s clean!) However, I smile now as I walk around the house because I don’t see swollen, rotting siding. And it’s wonderful having windows that open with just a finger or two. But possibly my favorite thing is knowing that we don’t have this huge bill looming in our future. It was something that had to be done before we sold the house (or take a big hit on the sale price).

Now that the contractors are gone, I have a huge work list to complete to rehab the yard, but I’m excited to dig into that (pun intended). Much of it has been going well and I’m surprised at how quickly the trampled grass and bushes have been recovering.

Yard Watering Recap

We’re coming out of the dry season, and what a dry season it was. We tied the warmest summer ever (1967) and got the record for the driest summer ever (1910). Even with all that, I’m happy to say that our yard stayed green and I think I used about the minimum amount of water possible to make that happen. Here’s the data from our sprinkler system showing the cumulative gallons used by year:

The 2015 line is especially interesting. It was very hot and dry that summer too, and even with all that water, my yard died. I had the settings really dialed in this year. The key was getting the runtime for each zone set properly and then trusting the Zimmerman algorithm inside OpenSprinkler to automatically adjust those runtimes based on the previous day’s humidity, temp precipitation and the forecasted precipitation. I only overrode it once when we had a streak of weather in the mid-high 90s.

The rain came a little earlier than it has the past two years so I’ve already shut it off, at least for now. The yard looks healthy enough and the weather is wet enough that I doubt I’ll need to run it again.

Storage Closet Cleanup

We have a fairly big closet at the top of our stairs that holds a bunch of stuff that doesn’t otherwise have a home: sleeping bags, board games, wrapping paper, vacuum cleaner, folding chairs, etc. It’s a mess. That’s not terrible except that we have to leave the door open because it is also the closet where I had the electrician run all my network jacks. That closet has a whole bunch of networking gear and two computers that are on 24/7. It gets way too hot if the door is closed. Some day I might build a ventilation system in there, but regardless of whether I do that, I knew I needed to build some storage that was better than our old wire frame shelves.To kick things off, I cleaned out the closet, took down the wire shelves and then patched all the old screw holes from those shelves. I even sprayed on some new wall texture to hide the patches. I had a leftover half gallon of the same brown color that is used in many other places in our house and it was the perfect amount to paint the closet.

The real improvement will come from some new storage cabinets, but first I needed a solution for the mess of computer wires. It had to just sit on the floor while I was painting and I needed it out of the way for the cabinet project. So the first build in this project was a very simple set of shelves to hold the computers, routers, battery backups and other miscellaneous gear. The shelves were a quick one day build (with Elijah helping) out of a sheet of 3/4″ plywood, some poplar to hide the exposed plywood edges on the front, and a bunch of pocket screws.
It’s not fancy, but the bulk of this will be hidden by the new closets along the same side wall anyway. And for me, this is glorious. It’s going to be so much easier to diagnose problems and I finally have all of the network jacks in our entire house connected at the same time. Nerdvana.

Now it’s time to build some big cabinets…

Garden Update

We started off the year having very little idea of what our garden would actually end up growing. Turns out, it worked pretty well! The box by the street has some strawberries and two zucchini plants. We did get some strawberries but that will ramp up quite a bit over the next two years as the plants mature. The zucchini have been producing like crazy. I think we might just do one next year.

The box closer to the house has a few more strawberry plants and six sun gold tomato plants. Having six of the same plant is overkill. I started a few different varieties in the house, took careful notes about which seeds were which, and then ignored all the notes when I picked the six healthiest plants to move outside. Oops.

Here are some changes that we’ll consider for next year:

  • Two zucchini plants is a lot. Maybe do one zucchini and one rhubarb?
  • I think it makes sense to put all the strawberries in one box. They are going to overrun whatever container they are in.
  • The drip tubing worked great, but maybe instead of carefully placing each emitter, I could use the small area sprayers.
  • Don’t try to start plants. It sounds like a great idea, but I did a terrible job guessing when we’d be ready to move plants outside. Warm weather came much later than expected and it was tricky to manage the big plants inside the house.
  • Tyla wanted to plant flowers but I think we waited too long for the seeds to take hold (too hot and too much shade from bigger plants.)

But all in all I call this year a success!

SimpliSafe Review

(This post will probably make more sense if you read part 1 from yesterday.)

Before I start talking about our new system, let me back up and explain what I want out of our home security system in order from most important to least important.

  1. If there’s a fire, get the fire department there as soon as possible whether I’m home or not.
  2. If someone tries to get in while we are home, I want to know immediately to have a little extra time to react and get the police headed in our direction. (In my dreams, the police pull up just as I’m throwing the bad guy onto the lawn and holding him there with a shotgun to the back of the head.)
  3. If someone breaks in while we are gone, at least we’ll know about it. This is probably the most common reason people buy a system, and while I like the feature, it’s not a huge selling point for me. Frankly, we live in a very undesirable theft target. If you’re crazy/smart enough to break into our house, you’re going to do whatever you want regardless of whether I have an alarm system installed.

Ok so back to my quest to dump my landline ($55/month) and replace my landline monitoring ($10/month) with cellular monitoring…

I chose SimpliSafe. They’ve target my exact scenario and they’ve been around for long enough that I trust them to provide me with a good product.

The setup process is extremely simple:

  1. Create your system by figuring out how many of each type of sensor you want. I recommend that you start small because it’s really easy to add more later and the only additional cost is that you pay shipping each time you make an order.
  2. SimpliSafe will configure your new base station for the sensors you ordered and ship you a box.
  3. They say that setup takes 30 minutes and they’re right (depending on how many sensors you bought.) Setup is SOOOOO easy compared to what I went through before! Basically, you plug the base station into the wall, activate your account online and stick your keypad on the wall. For each sensor, remove the tag to connect the included battery and stick it on the wall.

You’re done!

Unfortunately, my case wasn’t quite that simple. My base station came with a T-Mobile SIM card in it and the T-Mobile signal was so bad that I could only rarely get a connection from a single point in my house. After a lot of trial and error, SimpliSafe agreed to send me a replacement board for the base station that uses Verizon’s network instead of T-Mobile. That worked a lot better.

Our monitoring is now $15/month but we dropped $55/month for the home phone and $10/month for our old monitoring company. So we are saving $50/month! We’ll recoup the ~$400 hardware cost in 8 months.

I love these projects that cut out huge monthly bills! It’s much more fun to spend money when you know that you’re going to save that much in a short amount of time.

I also feel good using an alarm system that is easy to expand and modify whenever I want. I suppose there’s a chance that it’s less secure than my old system, but remember my priority list. I’m ok with that. I also don’t have any evidence that it IS less secure. My old system had plenty of wireless sensors and the landline was very easy to cut. A determined and intelligent burgler is going to know how to get through most consumer grade alarm systems anyway. The trick is to just be a more uninviting target than other people in your neighborhood. It’s kind of like hiking in bear country with somebody that runs more slowly than you.

Custom Alarm System

There is one major home improvement project that I’ve written very little about. Soon after we moved in, I went down a month long rabbit hole of learning about DIY alarm systems. The idea is basically to install the same level of hardware that a company like ADT would install, but skip the middleman. You install the hardware and you connect it to a monitoring company. We paid about $500 for the hardware and then $10/month for the monitoring. I wasn’t comfortable sharing the details of it in the beginning because I wasn’t sure how secure it was. That concern was probably unwarranted.

Our GE Concord 4 system worked flawlessly, but it was one of the hardest projects I’ve done. The hardware itself is relatively simple. All the sensors have two wires and they are either normally open or normally closed. The wireless sensors are easier to setup and just need to be paired with the base station. The catch is that the main circuit boards for these units are 1980s-90s technology. Forget connecting your computer to it and configure it. Instead you have to type incredibly long series of numbers into the keypad to change settings. For example, if you want to change a setting, you press 8, your four digit master system code, 0, 0, and the four digit code to select the right program setting. Then you actually get to make the setting which is usually a one digit number (on/off, number of seconds, etc.) The installation manual is 113 pages long. It’s intense.

But you know what? I’m still glad I did it, partially because I learned something that was really complex and because it saved us a LOT of money both on the initial hardware purchase and on the monthly monitoring. We have easily saved thousands of dollars compared to using a standard consumer alarm system.

But.

I’m getting tired of having a landline just for the alarm system. It wasn’t so bad when we moved in because our cell phones would regularly drop calls. Coverage and phones have improved and that’s no longer a problem. So the phone line really is just for the alarm. And no, you can’t use a VOIP line (like Comcast phone service) for an alarm. It has to be the old-fashioned POTS phone line.

Well the good news is that since I custom installed my own hardware, I’m free to switch over to cellular monitoring and switch to a different monitoring company if I want to. The problem is that I REALLY don’t want to go down that rabbit hole again. I started looking into it and it’s pretty complex and the technology is frustratingly ancient. I’m sure it would work, but I don’t have the patience.

Thankfully, a number of companies have stepped up to offer DIY home security products. You get the benefits of cutting out the middleman without the headache. This post is getting long so I’ll keep you in suspense until tomorrow about what we’re using now and how we like it.