
 I am far from an expert on fence building so after reading a bunch of articles on the web and enlisting some help, I built one wall of my fence before starting on the rest of it. This turned out to be a good decision because I could make all my mistakes on a smaller scale and then move more quickly on the rest of the fence. Here are some of the tips I picked up along the way:
- I used 10ft pressure treated 4x4s. You can get away with shorter posts but you have to be really careful about the depth of your hole. I prefer to leave them long and then saw off the tops at the very end of the project.
- Set the corner posts first. This allows you to string a line between them and make sure the interior posts are all perfectly aligned.
- Once you’ve determined where your posts sit (roughly every 8 feet), dig a hole that is roughly 10” in diameter and 3 feet deep. Dig so that the post will be centered in the hole once it’s lined up with the string.
- Put a few inches of pea gravel or clear aggregate at the bottom.
- You’ll need two people to line up the post. Attach a cheap 8ft piece of wood to the post, pound a stake in the ground and then screw the wood to the stake while holding the post perfectly straight in that direction (use a 4ft level.) Repeat for the other direction. Do this all the way down the line.
- Mix your concrete and pour it in being sure to push the concrete around the post and work out any bubbles. Let them dry for at least a day before continuing.
- I bought pressure treated wood for the rails, but you can probably get away with something else if you want to save money.
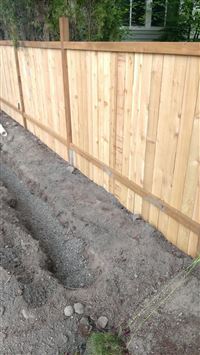
- String two lines between your corner posts at the height of each rail. The bottom rail is about a foot off the ground and the top rail is right at the top of your planks.
- Make sure you get those rails level or you’ll have a goofy looking fence. I used a nail gun to attach the rails to the posts. I was able to do this step by myself because I screwed in a temporary board on the opposite post to hold the rail in roughly the right spot until I attached both sides.
- Attach the planks. This is where a nail gun really comes in handy. I’m using a 15-gauge finish/trim nailer with 1-1/2-in. galvanized nails.
- If your planks but up against trees or bushes, consider staining that side of the planks before installing them. Some sites recommend staining ALL of your boards before you install them but I’m not going that route.
- Once everything is installed, let it sit for a week or two. The boards will dry out and shrink quite a bit. You should have installed the planks so they were tight against each other but after they dry, there will be 1/8-1/4” between them.
- Stain! I won’t give any tips since I haven’t stained the fence yet, but my plan is to use a sprayer with a semi-transparent natural cedar color stain. I’ll have to rig up some tarps to avoid overspray in our tight quarters.