Studio711.com – Ben Martens

Radio Controlled Flight

Flite Fest

I’ve blogged quite a bit about the guys over at FliteTest.com. They’re almost my sole source of information as I’ve leanred the RC hobby. Over the last 6 months, I watched every single one of their 400+ videos on YouTube.

There are lots of radio controlled plane/helicopter airshows around the country. The Flite Test crew travels to a lot of them, but they also decided to start their own this year. They decided to fund it with a Kickstarter and timidly asked for $5000. The hordes of fans smashed down their doors waving money in the air and they were fully funded in less than a day. They kept adding stretch goal after stretch goal. At the halfway point of their month of fundraising, they were at $32,651!

They wisely had quite a few options for fans to back them even if they couldn’t make it to Ohio for the Flite Fest event. I joined that group and pitched in some money. I can’t make it this year but I would absolutely love to visit them sometime in the future. It also got me excited to look at local RC airshows and possibly visit one here in Washington.

So kudos to the Flight Test guys on a massively successful Kickstarter campaign! I’m hoping that this outpouring of support will convince them to sign up for something like Patreon.com to help fund their twice weekly videos too. I’ve written to them about it and it sounds like they’re investigating. They provide us so much value that we’d like to give them some value in return!

FT Delta Maiden Flight

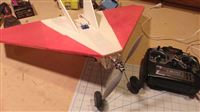
My second RC plane is an FT Delta built from a kit from the FliteTest.com store. This one uses the same “power pod” as my first plane. The power pod consists of most of the electronics – motor, speed control, receiver, and battery. The pod just pops off the first plane and straps onto the second plane. That saves a lot of money and makes it really easy to try multiple planes.

This plane only has two control surfaces at the back of the wing. They’re either ailerons or elevators depending on your perspective, but on the transmitter, you set the two to be combined. It’s called “elevon mixing.” So whether you’re going left, right, up or down, those two control surfaces do whatever they need to do to point you in the right direction.

While building this one, I covered the whole thing with Minwax to protect it from getting wet and also filled in the edges of the cut foam with hot glue. I made an attempt at painting the plane too. It looks ok from a distance.

So how did the first flight go? I made it about 10 feet and crashed. Second flight? Same thing. Turns out I had left and right reversed on my setup and didn’t notice it. Luckily this plane is a tank and other than some broken props which are cheap to replace, the plane was completely fine. I crashed a few more times that day. Some of them were because I was trying things I wasn’t ready for (like inverted flight) and later in the day the prop seemed to be popping off. My theory is that the motor got some mud in it and wasn’t spinning properly so I took it home and gave it a good cleaning.

Hopefully I’ll get this back out to the park soon and spend some more time with it. It’s significantly faster than the FT Flyer and it’s a lot more nimble too. It’s a good next step in my RC learning process.

RC Radios

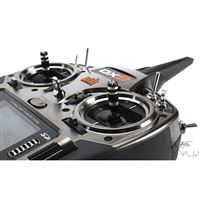
One of the most confusing parts of getting started with RC airplanes was trying to figure out which radio to buy. First of all, you don’t even have to buy one. You can just buy planes that come with cheapo radios. I knew I didn’t want to go that route because it ends up costing more and you don’t get to use a quality radio along the way.

If you decide to buy one that can work with lots of planes then you have to figure out which brand you want: Futaba, Hitec, Tactic, Spektrum, etc. Not knowing much about the differences, I assumed they were all kind of the same. Wrong. In general, each brand only works with it’s own brand of receivers and if you want to hook two radios together for teaching purposes, they have to be the same brand.

The simulator I bought came with a Tactic radio (Tactic TTX600.) While there’s nothing inherently wrong  with this radio, I later realized I want to invest in Spektrum. A huge number of Bind And Fly models come with Spektrum receivers in them. So if you have a Spektrum radio, you’re good to go. That meant that I ended up rebuying a similarly inexpensive Spektrum radio (DX5e) and then later on I’ll get a nicer computerized model (DX9?)

The detour through the Tactic radio only cost me about an extra $70 but it’s still something that you can avoid. Take some time to understand the differences between the brands, talk to friends who fly, look at planes you want to buy, and then make a brand choice. Simulators can work with a variety of brands.

It sounds like people sometimes end up with multiple brands of radios as they progress in the hobby, but to start with, you probably don’t want to keep spending money on radios.

Blade Nano QX Review

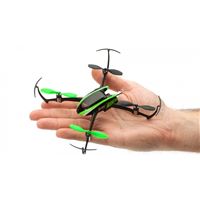
A newfound RC addiction in the middle of the rainy season in Seattle is a tough combo. Thankfully, indoor RC has been making tremendous progress in the last couple years. One of the products near the top of the list right now is the Blade Nano QX. It’s a tiny little quadcopter that flies extremely well. You don’t need much space to have a lot of fun. If you’ve been to our house, I regularly fly it in the man cave and downstairs in the living room/kitchen. I’ve even taken it outside a couple times when there is no wind.

The Nano QX comes in two packages. One is the RTF (Ready To Fly) and it includes a transmitter. The other option is BNF (Bind aNd Fly) which requires you to have your own Spektrum transmitter. If you’re just getting this as a one-off toy, then the RTF is probably the model for you. But if you’re buying other planes and helis  that use Spektrum receivers then BNF can save you money since you don’t need to keep paying for new transmitters.

My previous favorite in this area was the Syma 107 helicopter. That is a lot of fun for a very low price, but it doesn’t take too long to master it and then you’re a bit bored. Plus, I flew mine so much that I wore out the motor. The Syma has throttle, rudder and pitch. The Nano QX adds aileron so you can move side to side as well. It gives you a lot more control but it also is more of a challenge. Don’t worry about the learning curve though. The Nano can stand up to a beating, but if you do have some trouble, a second set of blades is included in the box. You can also replace everything else piece by piece if needed.

The awesome guys over at FliteTest.com have a video about the Nano QX as well. Give it a look and I bet you’ll want to buy one!

GoPro FT Flyer

Now that I’m an expert RC pilot (translation: I flew about 10 minutes without crashing), I decided to strap a GoPro onto my plane and take some video. GoPros and RC planes are a very popular combination. You can even set them up to feed the video live straight into goggles on your head so you can fly the plane as if you’re sitting in the cockpit. For this first test, I simply zip tied the camera to the bottom of the fuselage, right at the center of gravity. The camera was pointing straight down so the video is nothing wonderful, but I was thrilled that it worked. As I build bigger planes I’m looking forward to doing a lot more with this type of thing.

That day of flying also had a couple other firsts:

  • I got to go flying twice. (I need more than two batteries so that I can just have one longer trip!)
  • As I was flying, I saw something float down to the ground. A quick flyby showed me that one of my wheels had fallen off. That made for an interesting landing.
  • I hand-launched the plane a couple times since the landing gear needed some attention.
  • I completed my first loops.

I’ve included the video below, but like I said, it’s not that amazing. I did fly overhead a few times though. I’m standing right next to a picnic table along the edge of the field. You can spot me for the first time around the 20 second mark in the video. This plane only has three channels (throttle, elevator and rudder) so the turns end up sliding the plane around strangely. I have a couple more three-channel planes waiting to be built but then I’m looking forward to getting/building a four channel model.

RC Flight Attempt #2 (And #3)

I waited all week for the weekend to arrive so I could attempt another flight. On Saturday I headed to a bigger park, checked over the plane, connected the battery and took off. My flight couldn’t have lasted longer than a second. Checking over the plane, I discovered that one of the set screws that holds the prop in place was missing. There was no way that I was ever going to find that tiny little screw in the grass so I headed to the hobby store down the road. After admitting my complete newbie status, they were able to point me to a new pack of screws and a couple other spare parts that I’ll probably need too.

The plane repair went quickly and I was ready to take off again. This time it worked! No mistakes! Eventually my heart stopped racing and I was actually able to get it trimmed out and enjoy the flight! I flew through the first battery (about 6 minutes), popped in the second one and flew through that too. The plane doesn’t fly beautifully. It’s only has throttle, elevator and rudder, but it’s still a lot of fun. I can’t wait to get it up in the air again! I might pick up a couple more batteries so that I can fly for a bit longer on each trip.

Maiden Flight

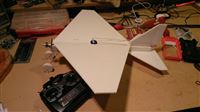
My RC adventure took a big step last weekend. All the pieces came together, and, after hours on the RC simulator, I had my first real flight!

The plane looks really basic and that’s because it is. It’s the FT Flyer from the Flite Test 3-pack swappable kit. They have a series of planes that all use the same power pod (speed control, motor, batter, receiver, etc) and this kit included three different planes. All the pieces of foam are precut and you just follow their build videos to put it all together. Even with all that help, I had plenty of mistakes in my first build, but hey, it flew! Sort of.

On Sunday afternoon as the sun was setting, Tyla, Elijah and I headed down the street to the school and carried the plane out to the soccer field. I powered it up and took off. Success! After a few uneasy loops, I brought it in for an ungraceful landing. It doesn’t look very nice but nothing was damaged. When I picked it up, the rubber band snapped the landing gear back into place and I was ready for my next flight. The second flight was longer and I decided to try to trim it out. I had balanced the plane but it really wanted to dive to the ground. I didn’t want to take my eyes off the plane so I reached down to my transmitter to hit the elevator trim button and hit the power button instead! The motor went to full throttle and the plane dove straight into the ground. Oops! The plane was almost completely undamaged except that the prop was broken. I had plenty of spares but they were all back home and given the lack of remaining daylight, we called it a day.

Later that evening I got it fixed up and eagerly await my next opportunity to snag some daylight and fly again! I’m planning to get more comfortable with this plane, build another one or two from the kit and then hopefully buy something a little nicer. I want to get a lot better with fixed wing flight before moving on to multirotors.

This hobby combines a lot of smaller hobbies like model building, electronics, and video games. I could definitely see this becoming addicting. If any of you local friends are interested in getting a peak at the hobby, please let me know! It would be awesome to have some of you doing it too.

Getting Started With LiPo

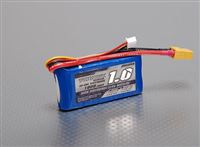
Rechargeable batteries have changed a lot since I was a kid. They used to be big and bulky and not hold much of a charge. As I’m learning about RC planes, I’m learning that the new battery technology is pretty impressive. They’re very small, pack a lot of punch and use computerized chargers to make sure they charge correctly. They are, however, a bit more dangerous (or else I underestimated old rechargeables.)

Modern rechargeables use lithium polymer technology (LiPo). These are some of the safety tips I’ve gathered in my research:

  • These things are prone to catching fire in many different circumstances (overcharging, drawing too much current, puncturing or damaging the battery, etc.) They should always be stored in a cool dry place inside a fireproof bag.
  • Never leave the batteries unattended while charging and preferably do it on a concrete surface with a smoke detector overhead.
  • LiPo batteries have both a positive and negative power plug as well as a plug that provides individual access to each cell in the battery. The latter is useful for charging and balancing the cells.
  • LiPos are made up of various numbers of cells. Never charge a cell over 4.2V or let it discharge past 3.0V.
  • For best results, only discharge 80% of the capacity.
  • LiPo batteries should be stored at around 3.7V per cell.
  • Modern chargers are computer controlled and will help keep each cell in your battery balanced, avoid charging too fast, and help you keep within the recommended voltage limits.
  • If you’re going to cut the connector off a battery to place it with a different type, don’t snip both wires at the same time. You’ll short out the battery! (Seems obvious in hindsight but I’m pretty sure I would have done it without thinking if I hadn’t seen a warning.)

These little technological wonders can crank out a huge number of amps for longer than seems possible, but you need to treat them with a lot of respect. FliteTest has a good video and accompanying article about batteries in their beginner series.

RC YouTube Series

In addition to the simulator, I’ve also been learning a lot from the Flite Test YouTube channel. These guys have apparently been around for quite a while so I have a lot of videos to catch up on. They review various RC planes, have instructions for building your own planes from scratch, and they recently started a fantastic beginner series. If I’m not messing around in the simulator, I’m probably watching one of their videos.

RC Flight Simulator

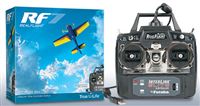
I posted a while back about building an autonomous multicopter. As I read more about it, I realized that’s a bit of a big leap to take. First I should probably be able to fly it. And it turns out that multicopters aren’t the easiest thing in the world to fly. It’s probably easier to start with a plane. But if you’re going to start flying an RC plane, you probably want to either have a friend who can help you learn or get a simulator. I chose the simulator route, and boy, is it a good thing that I did!

There are a few to chose from, but I went with Real Flight 7 with an actual transmitter that you could use to fly an RC aircraft later. When it arrived, I wondered if I had blown my money on something I didn’t really need. I’ve played plenty of video games. I’m familiar with dual joysticks and I’m comfortable with controlling something whether it’s going away from me (easy) or coming straight at me (hard.) All those years of practice in video games probably helped somewhat, but I spent the first HOURS crashing my trainer plane repeatedly into the ground. The simulator paid for itself in the first 5 minutes.

After probably about 5 hours with the simulator, I was getting to the point where I could fly somewhat respectable figure 8’s and generally land the plane without destroying it. I was feeling pretty good about myself until I remembered that I had turned the physics all the way down to “beginner.” Bumping it up to intermediate put me almost back to square one. This is clearly a good use of money.

The simulator itself is fairly detailed. My system can easily handle the graphics cranked up to their max level so it looks very nice. It has a lot of planes and airfields. More are downloadable from the community online. In addition to normal solo flying, there are challenges like landing on a specific spot, breaking balloons, bomb drops and more. These are fun ways to increase your skillset. There’s also a multiplayer arena that I haven’t ventured into yet.

By the time the weather outside is nice enough to fly, I’m hoping to be confident enough to send a physical plane up into the air.