
 As you may already know, I convert each year’s blog posts into a hardcover book. I skipped it in 2010, so over the last month I’ve been putting together the 2010 and 2011 books. They include not only the blog posts but also my moblog photos and all my tweets. Yes, it’s odd, but these things really do look pretty professional when they’re done. The folks at Lulu make this incredibly simple and it’s very cost effective. If you’re crazy and you want to buy these for yourself, you can get them on the Lulu website. But in reality, I don’t expect anyone to buy these and read through them. It’s just fun to have them sitting on the shelf and every once in a while we’ll grab one, flip to a random page and read the day’s entry. And who knows, maybe some day my grandkids will open a trunk and find these books laying around. I know if my grandpa had a book like this I’d love to read through it! Then again, my grandpas are a lot more interesting than I am!
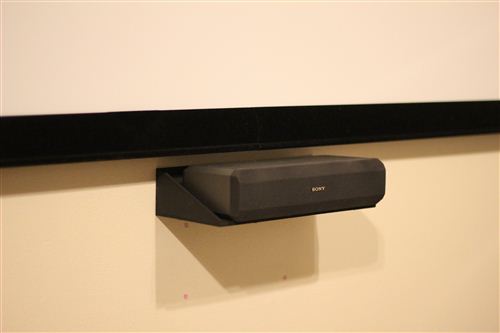
Center Channel Speaker Mount
My center channel speaker doesn’t have a place to accept a wall mount on the back of it. I originally tried using a couple 6” shelf brackets to support the speaker, but it didn’t look great, especially when compared to the other speaker mounts.
After some thought I ended up building a small half box out of 1/4” MDF. The construction was pretty simple and then I finished it off with flat black spray paint to match the speaker. The end result is that don’t really notice the box around the speaker and it looks great!
In the photo below you can see the undried fill holes from the old shelf brackets. They stuck down pretty far below the speaker.
Dimmer Switch
 We like to eat dinner while we watch movies in the theater room. For some movies the light bouncing off the screen is enough to illuminate our food, but for darker movies, it can be a challenge to scoop up those tricky peas.
Since it’s pretty difficult to do anything with the vaulted ceiling, I added 12 feet of rope lighting behind the couch. It’s mounted to the wall but in such a way that you just see a glow emanating instead of direct light.
To top it off, I added a dimmer switch. We started with a Leviton dimmer switch extension cord. That worked ok but I thought I could do better so I picked up a Lutron MIR-600THW dimmer switch. It took a little more work because the outlet I wanted to use wasn’t on an outlet yet.
I cut into the wall yet again (this was the 9th time I’ve used the drywall saw in this room) and made a hole for the switch in the same stud bay as the outlet at the standard switch height. After flipping the circuit breaker off, I removed the outlet, removed the connection between the top and bottom outlet so only half would be switched, fed some Romex up to the new hole and then wired in the switch. Perfecto!
Now we have a dimmer switch that we can use to give us just the right amount of ambient lighting. But it doesn’t end there. This switch has an infrared remote control! It was a piece of cake to set up our fancy Harmony One to control the light switch.
The dimmer switch worked out so well that I’m thinking about adding one in the bedroom too. No more getting out of bed when we finish reading and have to decide who gets out of bed to turn off the lights.
Speaker Mounts
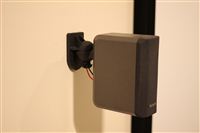 The theater room previously had speaker stands for the four corner speakers and a box holding up the center channel. I decided to go with a wall mount since it would look a little nicer and free up some floor space. The only problem was getting the wires down the wall cleanly.
I ended up running them inside the walls. The rear speakers were fairly simple because there’s no insulation in that wall. I drilled a small hole at the top and a little bigger hole at the bottom. It took some work with the fish tape but I got those pretty easily. I was able to modify the speaker mounts from MonoPrice so that the wire appears to come directly out of the mount and right into the speaker, and I used the mounts upside down so they’d fit my speakers.
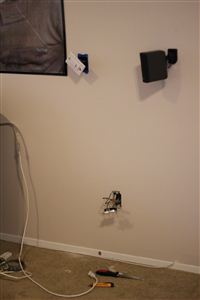
For the front speakers, I had to make a three sided cut at the bottom of the wall and fold the drywall back to reach in and grab the fish tape. That meant more spackling and texturing to patch the hole, but there was no other way to find the fish tape in the wall.
The speaker wire was a 100ft spool of wire from MonoPrice rated for in-wall use. I suppose I could have switched to something else once I got out of the wall, but I just stuck with it for the whole run.
I had initially intended to pull the baseboards off and hide the wire behind/under them, but there’s too much cable and too little space with my mini-half-height baseboards. Instead I picked up some Baseboard Cablemate strips from Home Depot. It should just look like I have thick baseboards when I’m done running the wires inside there.
And finally, the last piece to the puzzle was mounting the center channel. It doesn’t have a place to screw in a speaker mount like the other speakers. I picked up some 6” shelf brackets from Home Depot, but I’m not happy with how they look. My new plan is to build a small box with an open front, mount that on the wall and then place the speaker inside it. The wires would run out through a hole in the back and in to the wall.
This project is coming together nicely! I have a pile of paint swatches on my desk. Picking the color will be the next step. Right now I’m leaning toward a dark gray but I’m not sure if I’ll throw in a blue tint.
PS. In case you haven’t noticed by now, I love MonoPrice. If you ever need any kind of cable, go there first. Why pay $40 for an HDMI cable from Best Buy when the same thing is $3 from MonoPrice?
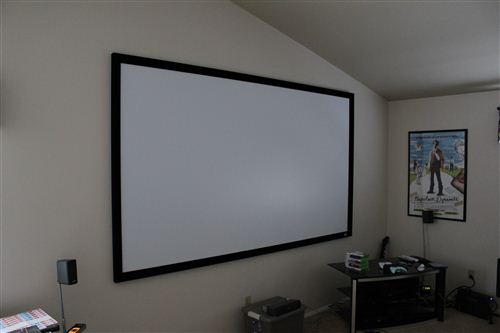
Projector Screen
The next step in the home theater project was getting some sort of projector screen in place. I’ve been using a blank wall since we moved in, but this really isn’t a wonderful solution. There are a couple nail holes that screw up the picture, there is texture on the walls, and the paint isn’t pure white.
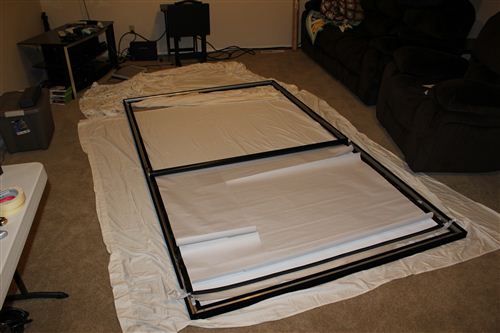
There are a number of articles online that describe various ways to create you own screen. After doing a lot of research, I decided to opt for a cheap pre-made screen instead. I purchased a 120” Elite Screens Sable Fixed Frame screen. One of the reasons this screen is less than one third of the cost of most screens is that it packs down into a reasonable size box for shipping. That translates to “some assembly required.”
It took me about 1.5 hours to get the screen put together, but I could probably cut that in half now that I know what I’m doing. You basically assemble the frame with a few screws and then methodically stretch the material with clips to provide a smooth flat surface. Tim and Chelsea came over to help mount it on to the wall and it took all four of us to get it on there.
I’m fairly pleased with the end result The black velvet border really sucks up any light from the projector that flows over the edge of the screen. That is important because it allows you to easily fill the whole screen with the picture. The screen does have some imperfections and a noticeable hot spot when the picture is a solid color. I’m playing around with a few ideas to minimize the appearance of the flaws, but for the price, this is still good deal.
Next up: mounting speakers on the wall and running speaker wire inside the walls.
Projector Cables
 Very shortly after buying the projector, I built a simple shelf mount for it. It was easier and cheaper than hanging it from the ceiling and the Epson 8350 has awesome lens shift so I was still able to get the picture in the right spot. However, the cables were left dangling down the wall. I finally got around to fixing that this past weekend.
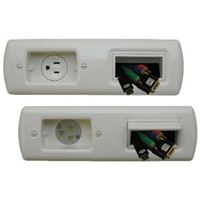
The key to the project was finding a good way to get power up to the projector. I didn’t just want to add an outlet up there, because I want the projector to run off the battery backup system in the AV rack. Enter the PowerBridge. It’s effectively two outlets connected by a piece of Romex. The special thing is that one outlet is male and the other is female. That means you can connect your extension cord to the outlet at the bottom and run it to whatever power source you want. There is also an opening for HDMI cables to come out. This is a great way to wall mount your TV without paying for an electrician! The kit had everything I needed except that I needed to buy more Romex because the included 6’ length wouldn’t reach up to the projector.
The other trick to this projector is mounted near the ceiling and this room has vaulted ceilings. That means that there is a ceiling joist between the projector and the floor. I had to cut an extra hole in the drywall just above the hole and drill through to feed the cables down to the floor.
The extra cut is the part that took the longest. I did a pumpkin cut on three sides, folded it back and then made my holes. After running the wires, I folded the drywall back in place and applied spackle and sanded until it matched nicely again. I sprayed on some orange peel wall texture and it’s almost as good as new. Obviously it needs a coat of paint to completely match, but I’ll do that later once the rest of the project is done.
Next up: mounting a projector screen.
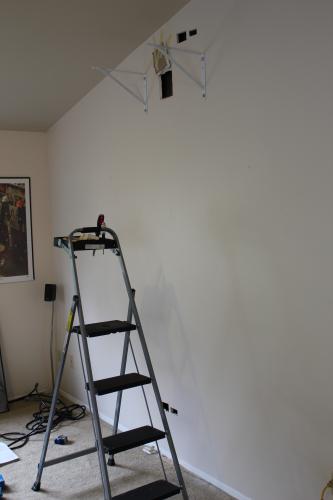

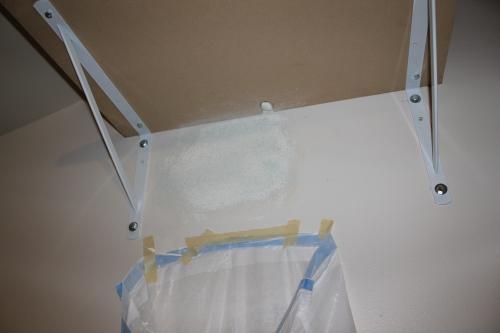
In picture #3, the drywall wouldn’t quite stay flush so I applied a little glue and taped it in place until the glue dried. And in picture #4, yes, that’s a trash bag taped to the wall. I had it there to catch most of my sanding dust and any of the spackle that I might drop.
CascadeSkier for Windows Phone 7
 I’ve spent way too much time working on my most popular Windows Phone app this winter. Version 3.0 hit the marketplace in November and I just released version 3.5. There have been numerous updates for various things but biggest changes were support for multiple live tiles and live tiles that flip over to reveal a one day weather forecast. The updates have been very well received and it’s very rewarding to see the positive reviews fly in. Right now this is the #10 paid app in the sports category. I realize that’s not saying a LOT, but I’m still proud of it.
A few years back you may remember that I tried to start a website called cascadeskier.com. That was where the gadget first started and then the Windows Phone app came later. The site was supposed to be devoted to the Pacific Northwest skier. I cancelled it after a few months because it was way too much work for one person to handle and I wasn’t getting the kind of traffic numbers that I was hoping for. I was fed up with the whole thing and I let the domain name lapse. Big mistake. I regretted it pretty quickly, but a squatter had purchased the domain. I patiently waited for two years until they gave up on the domain and then I bought it again.
So now if you head to cascadeskier.com, you’ll see a simple page showing off the Windows Phone app and the Windows 7/Vista gadget. There’s also a demo video showing off the current version of the app.
The astute among you will notice a hint at a Windows 8 version on the site. I’ve played around with it a little, but I really need to devote some major time to that. I think I’m going to slow down on the Windows Phone app updates for a while and focus on Windows 8.
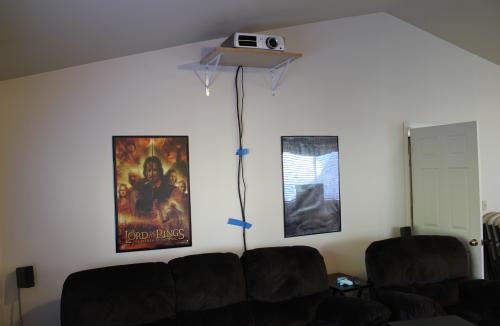
Projector Mount
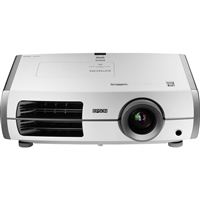
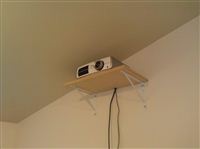 The first step after getting the projector running was getting it mounted. One reason I picked the Epson 8350 is that it has a huge amount of available vertical and horizontal lens shift. This allows you to place the projector just about wherever you want and then place the image at the right spot with no distortion. It will move the image about one screen above and below the lens and one screen right and left of the lens. There aren’t many other projectors in this price range that will do that.
As you can see in the picture, I didn’t purchase a fancy mount. And because of the lens shift capabilities, I didn’t even do an upside down mount like you would normally see. I grabbed a couple shelf brackets from Home Depot along with a 2’x4’ sheet of 1/2” MDF. I originally tried 1/4” MDF but it bent quite a bit with the projector on it. I built a little lip all the way around so it won’t slide off if we have a little earthquake or something like that.
The mount is far from beautiful, but it’s functional. Once I get around to painting that wall, the shelf will be painted to match. The next step is probably going to be running the wires down from the projector inside the wall. That’s not going to be simple though because it’s mounted up in the trusses of the elevated ceiling and I’ll need to cut the wall open halfway down to get through the horizontal piece of the truss.
It works wonderfully though. It creates a lot more seating area underneath and feels a lot more professional. It also means that when people get up they don’t have to walk in front of the image, and if we ever get a Kinect, we’ll be able to play it without blocking the screen.
There are a lot more projects like this coming, but it has gotten to a point where I can focus on a few other more pressing house projects.
Network Cabling
 While I would love to have network cable installed in the entire house and run to a nice patch panel, realistically that’s either going to take me forever or cost a lot of money. So for now I’ve settled with running a couple wires from the family room to the theater room. The rooms sit on top of each other and share a wall in the garage, so it was a pretty simple job. I ran the cable out through the wall in the family room to the garage, up the other side of the wall, and then punched through into the theater room. It ended up looking really nice because all of the networking gear can stay upstairs in that room and the family room just gets the TV and a PC to drive it.
One great tip I got from Logan was to drive a six inch nail through the wall before cutting into it. This not only helps you locate where you need to cut on the other side of the wall, but it will also give you a hint if you’re trying to cut through something solid between the walls.
This is a tiny step forward, but I’m excited about what this room is going to turn into!
P.S. You may have noticed that I started a new blog category called “Man Cave.” Any time I do an improvement to that room, I’ll be posting it with this tag so that you can find them all easily if you are interested.
The Home Theater Begins
 Tyla thinks we bought this house so that we’d have more room, own some dirt, etc etc etc. Wrong. We bought this house so that I could have a projector again. Those of you who have been reading for a while may remember that back in Jersey, we had a little theater room set up on the ground floor. That projector was only 800×600 but boy was it fun! There was no room for a projector in the condo, and ever since leaving that projector behind in Jersey, I’ve bided my time waiting for the opportunity to arise again.
As we walked through various houses, the thought of “where can I stick a projector” was never far from my mind. When we walked into this house, it was obvious. Upstairs there is a 15’x25’ bonus room with a huge wall just begging for a projector. I patiently (I’m lying) waited until we bought the important things like a fridge, but it wasn’t too long before I couldn’t wait anymore. I pulled the trigger on a new projector.
I present to you the Epson 8350. It’s a 1080p 3LCD projector, and depending on how it looks, I’m shooting for roughly a 120” diagonal screen. It’s going to blow my mind when it arrives. I won’t even have any furniture to put in that room yet, but details details, first things first! You can expect a lot more photos of this as soon as I get it set up. After that I’ll have a lot more projects lined up to make this into an incredible man cave!