Studio711.com – Ben Martens

Maker

IOT Candy Scale

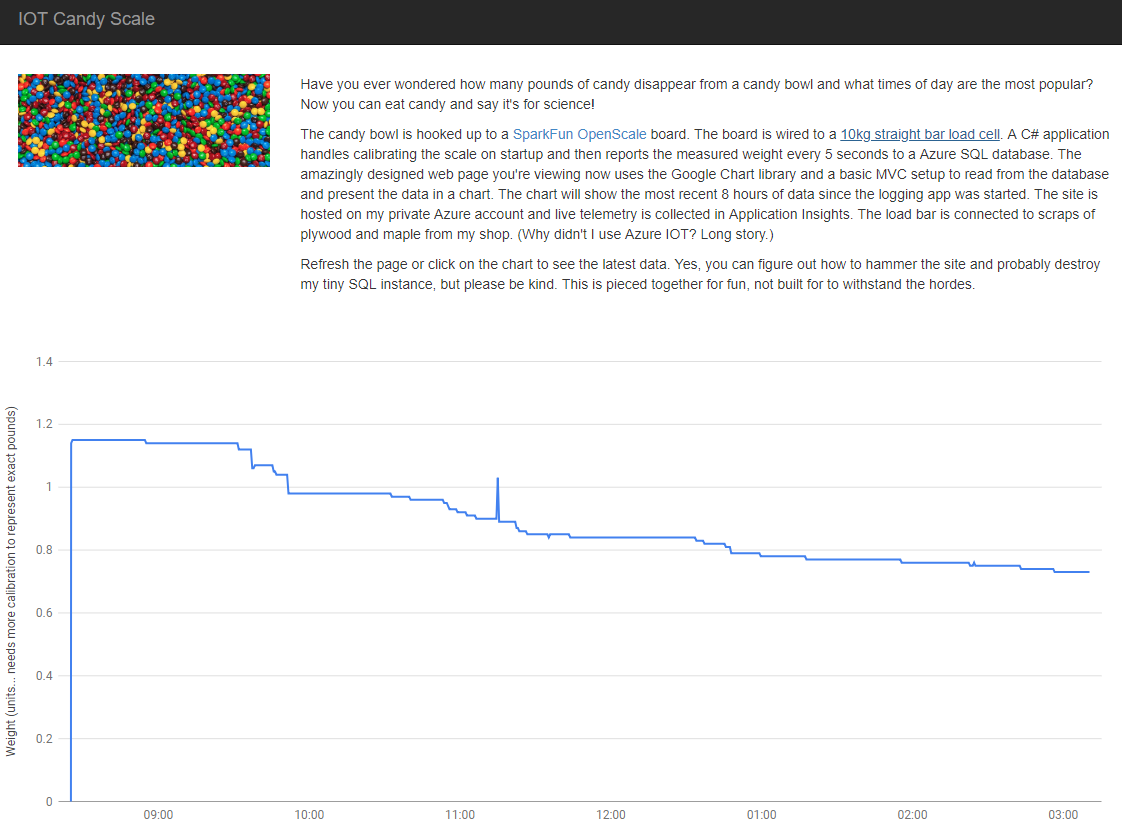
I’ve been thinking about building an internet enabled scale for years now, and recently, I finally got around to building it. Sure, there are plenty of WiFi scales these days, but I wanted one that automatically took a measurement every few seconds and uploaded it to the internet where a website would display a continuously updating chart. I suppose a product like that exists, but I thought it would be more fun to make it myself.

The electrical components came from SparkFun. They make an OpenScale board that did almost everything I needed when connected to a load cell. The board was already programmed to have all the features I needed for calibration and taring the scale. Originally I had planned to hook that up to a WiFi-enabled Arduino or Raspberry Pi, but I kept it simple and just plugged it into my computer. The computer ran a simple program that I wrote to communicate with the board and get a reading every 30 seconds. Those readings were uploaded to a SQL database in Azure and then I wrote a website that used the Google Chart Library to display the measurements.

There are a lot of technical terms in that last paragraph, but it was mostly just plugging together a bunch of components to make the solution and I had it finished in a couple nights (after a lot of research to find all the components!) I mounted the load scale on a piece of plywood and connected a bowl to the top of the load cell. Voila!

The scale made its debut at work to celebrate my 12th anniversary at the company. You can see the live website at http://candyscale.azurewebsites.net/ It will always show the data from the last time I had the system set up and running. I’m hoping to try it again at Halloween.

Fun With Vinyl

I’ve been having a lot of fun with the Cricut that we bought as a family Christmas present. I bought a roll of vinyl and transfer tape, and I’ve been having fun experimenting with them. Below are a few photos of things that I’ve drawn and cut. I realize that some of them won’t make sense because they are random words from projects at work, but it’s still neat to see how cleanly and nicely these come out. I have access to a large-format vinyl cutter at work, but it’s a lot easier to experiment and learn with the Cricut at home. Plus, all of the drawing work that I’ve done for the laser cutter in the past transfers very well to being cut out of vinyl too.

Laser Cutter Puzzle

The idea of making a custom puzzle has always intrigued me. I’m partially interested in the computer science problem of generating an random puzzle with an arbitrary size, and I’m also interested in the physical process of making it happen.

That computer science problem has been on my list for a long time, but finally I realized that I shouldn’t block the whole project on getting around to writing that code. It took a lot of searching, but I finally found a good, free online tool: Wolfie’s Puzzle Generator.

The next step was to pick a picture. A good picture has a lot of visual interest so you don’t have huge areas of “blue sky” pieces. I wanted to make this as a Christmas gift for Mom so I also wanted something that meant something to her. I settled on a picture of the Seattle waterfront that I’m pretty sure I took while they were out here visiting. I cropped it down to get rid of most of the boring blue sky.

I printed off a 16×20 version of that at Costco and then used 3M spray adhesive to attach it to a thick art board from the craft store. By the way, at 240dpi, this image was almost exactly 20″ wide with no scaling. The picture looks gorgeously sharp. It’s incredible how good modern digital cameras are!

Then it was off to the laser cutter. I spent a long time messing around with various tapes trying to find one that would help protect the surface from burning but also would peel off easily after being cut. I never succeeded. Maybe my adhesive wasn’t strong enough, but for some reason the tape would always pull off with the picture instead of leaving the picture stuck to the art board.

I settled on doing three light passes to slowly cut through with minimal burning. You can still see some burning around the cuts but the picture hides a lot of it. I wanted to make a 1000 piece puzzle but I only squeezed 260 in there due to the dimensions of the pictures and not wanting to make microscopic puzzle pieces. These were 0.75″ square so they were already pretty small.

I don’t expect this puzzle to hold up to a lot of beating but hopefully it will at least work once! If you want to see a video about this, David Picciuto has a making a laser cutter puzzle.

Laser Cutter Marquetry Butterfly

Search for “marquetry” images and you’ll be blown away at the art form of combining small pieces of wood to make amazing pictures. I’ve been intrigued by this, but I’m a nerd so I did it on a laser cutter. I thought it would be way easier and it probably was…. but it was still a challenge.

A while back, David Picciuto from Make Something sent me a box of small wood scraps. There were a lot of very interesting species in there, but they were so tiny it was hard to think of something to do with them. (Kinda makes sense why he would give it away, huh?) Then I hit upon the marquetry idea.

A butterfly seemed like a good first attempt so I found an image online that was close to what I had in my head and then tweaked it and made it into a laser cutter file. I spent many hours tweaking my design with test cuts at the laser cutter to get it as intricate as possible without making pieces so small that the kerf of the laser would totally obliterate the tiny piece.

In the end, I combined coconut palm, walnut, maple, purple heart and a couple other woods that I don’t know the names of to make the butterfly you see below. It’s pretty fragile, especially the antennae, but it at least held together long enough to take a photo. The dark outer wood is the coconut palm. In addition to the top border that you see, I also cut a solid bottom piece that everything glues on to.

This one is a Christmas gift for Mom. Merry Christmas!

Wood Sign

Router-carved signs are a common sight at fairs or even in pop up shops at the mall. I’ve been watching a bunch of Dave Rhoten’s videos on YouTube and finally I decided it was time to try it for myself. I purchased a Dewalt DWP611 along with two special router bits and a nice base plate from Dave’s store.

I bought 1×8 select pine from Home Depot (mostly knot free) and put on a couple coats of shellac. Then I used the laser cutter at work to draw the letters that I wanted to cut. That made the layout portion of the project very easy!

The next step was the most time consuming. I used a very narrow V-bit to carefully cut around the outside of every letter. Then I put in a bigger 90 degree V-bit to draw the big cloud around the outside and cut out everything between the cloud edge and the edge of the letters.

After a little cleanup with some chisels to remove any remaining high spots, I covered the whole piece in black spray paint. When it was dry, I sanded the top which removed the paint from the letters and the part outside the cloud leaving the indented part black. The shellac coating helped to keep the paint from bleeding too deep into the wood on the parts where I didn’t want it to stick.

Finally I used my keyhole bit to cut a slot in the back for a screw or nail so it could be easily hung on the wall.

This was a gift for Don’s brother and his wife in Montana as a thank you for letting us stay with them. And since I was making one, I decided to make two and give one to Don as well. It’s a fun and relatively quick project, but it takes patience!

Happy Birthday Tyla!

Happy birthday Tyla! On Saturday she chose to spend some time down by the river in Monroe, Sunday afternoon was spent eating fried chicken with her family and playing board games, and then tonight we are going out for Thai food. That should do a pretty good job at filling up her love cup.

I was happy to finally share a project I made a few weeks back. I laser cut a tree out of a piece of cherry plywood and then dug a mortise out of a block of walnut to hold the tree. The idea is that this can sit on her dresser and hold small jewelry. I used a random scrap of walnut and it had some beautiful grain in it that was perfect for this project.

I didn’t invent this so if you’re interested you can see lots of variations of this idea on Etsy and various craft sites.

Laser Cut Decorations

If you talk to Elijah, the first thing you’ll probably hear is that he is four now. For his birthday, Tyla came up with the idea of a Winnie the Pooh theme because that’s pretty much the only thing that Elijah watches or listens to these days. He had a Tigger shirt, a cake with all the characters on it and decorations around the house. Thanks to Tyla for putting that all together!

She also had the idea of having him hold a large 4 and posing for some pictures. Instead of buying one, I decided to cut it out on the laser. I did two of them with the top one also having his name cut out. I painted the top piece yellow, painted the bottom piece black, and then glued them together. The hardest part of the idea was getting a four year old to smile and look at the camera!

Vinyl Cutter

“The Garage” at work is like Willy Wonka’s chocolate factory for makers. There are lots of different tools that you can use for free (after you take a training course and usually provide your own materials.) I’ve been having lots of fun with the laser cutters, but recently I got trained on the vinyl cutter.

Our vinyl cutter is kind of like a huge (~36″ wide) ink jet printer that has a knife on the end instead of ink. You “print” on rolls of vinyl that are sticky on one side. When you cut the sheet, you’re just cutting through the vinyl but not the paper that covers the sticky side. You then apply another piece of sticky paper to the top of the vinyl. Peel off one side of your sandwhich and leave either the positive or negative space that you cut out. That made no sense because I don’t know what most of the things are called.

But blah blah blah, it’s fun! The computer side of things is roughly the same as the laser cutter. Files need to be in vector format and I can easily reuse most of the drawings that I did for the laser cutter. The first project was the sign for Tyla’s Mother’s Day gift. I headed back and did a couple more.

The first was vinyl for both sides of one of Ellijah’s toys. He now has a custom semi trailer!

I also printed a “No soliciting” sign for our front door. We get a LOT of door to door sales people and I have a standard policy of never buying or signing anything at the door. I used to have a dinky little piece of paper taped to the door but this looks a little nicer. It’s not quite as obvious, but some people ignored the old sign anyway.

I’m looking forward to spending some more time on the vinyl cutter. It opens up a whole new set of project possibilities.

Mother’s Day Gifts

Tyla and I don’t usually exchange gifts for Mother’s Day and Father’s Day, but I’ve been wanting to try out the vinyl cutter in the maker space at work and this seemed like a good excuse. You can easily buy a very similar sign on Etsy, but I wanted to see how hard it was to make one myself.

I had quite a bit of extra 8/4 maple laying around so I cut it in half and got it down to the approximate size of the finished sign. Then I spent some time on the vinyl cutter and cut out a couple versions of the sign, figuring that I’d screw one up and need to try again.

I stuck the vinyl down on the wood and the peeled up the letters, being careful to leave the interior of letters like A and O. Then I applied two coats of purple spray paint and peeled up the vinyl. That part took quite a while because the paint had made the vinyl brittle, but eventually I was done and it came out pretty well.

The final step was using a keyhole router bit to cut a notch in the back for easy hanging.

Will I do this again? Ehh… maybe if it’s something really custom, but it did take quite a while. If the sign you want is on Etsy for $20, it’s probably worth just paying for it.

Elijah also made a sign for Tyla. Ever since he saw this piece of purpleheart, he has talked about making it into a sign for Tyla. I bought a white pen and he wrote his name on the board. I finished it up with “loves mommy” and added a couple coats of spray lacquer.

Happy Mother’s Day!

Gift From Bob Claggett

Bob Claggett runs I Like To Make Stuff. He has weekly posts with great projects that are achievable for the common man. Those projects span woodworking, electronics, 3D printing, model making, and much more. It’s one of my favorite YouTube channels.

Bob also hosts a weekly live stream on Twitch where he works on a project and chats with people watching. It’s a fun way to interact and see what he’s working on outside of his videos. On Twitch, there is a way to send the content producer some money. It’s basically like a tip jar. On Bob’s channel, whoever puts in the most tip money during each stream gets a custom badge cut out on his laser cutter. A couple weeks ago, I was the winner. If you start watching around the 1 hour 58 minute mark, you’ll see my donation and short battle with another user who was trying to win too.

Watch live video from ILikeToMakeStuff on www.twitch.tv

And then the video concludes with him cutting out my custom badge. It arrived a few days later with some extra swag thrown in. Thanks Bob!

For the curious, that donation only amounts to $20. I figure if I was in the Atlanta area, I’d be happy to buy him a 12 pack of beer for all the knowledge he’s given me so I just did it virtually.