
I’ve been talking about building an Adirondack chair for so long that it’s embarrassing. It’s been at least four years if not more. There always seemed to be other projects that were more pressing, and my excuse was that I still didn’t know exactly how I wanted to build it. Over the years, I sat in a lot of chairs trying to figure out what makes a comfortable Adirondack chair and I finally decided that a contoured seat makes a huge difference. Unfortunately that also ups the difficulty of the build and gave me another reason to put it off.
Finally I stumbled across some plans from Woodworkers Journal that looked like just what I wanted. Even better, they had done a refresher of the plans complete with a 15 minute video series showing all the steps. Bingo.
A couple weekends ago, I headed to Home Depot and picked up a bunch of cedar boards. The plans say pine but I decided to go with cedar as it seemed like something that would stand up to the weather better (not sure if that’s true.) Instead of trying to find the minimum sized boards that I needed, I bought a few bigger 8″ wide boards with the intention of trimming them down to size. The cost was about the same and it was a lot easier to find bigger boards without warping or cupping.
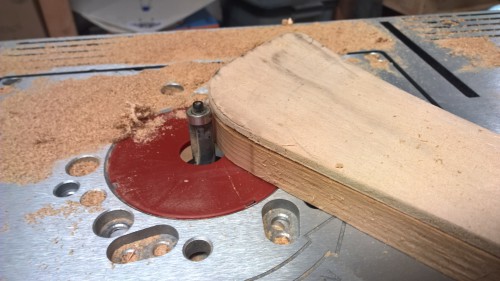
While I’ve done a lot of wood projects over the years, this is the most complicated plan I’ve ever followed and easily the nicest looking piece of furniture I’ve ever attempted. There were a couple new skills involved in the project. One was template routing. I spent a lot of time drawing out all the different pieces onto 1/4″ plywood and then I cut them out with a jigsaw and sanded them to perfect shape. To make the actual cedar pieces, I used double sided tape to stick the template onto the cedar and then used a flush trim bit in the router table. The top of the bit is a bearing that rides along the template and then underneath it’s cutting away the cedar allowing me to perfectly replicate the shape of the template on the cedar. Pretty cool!
The second new skill was cutting a taper into the back slats. I haven’t yet built a really nice tapering jig, but I was able to throw one together with some hold down clamps. It wasn’t pretty but it did the job well and gave me repeatable cuts at the right angle.

I was surprised at how well the whole thing went together. The only real hiccup was the upper back frame (part H) came out about an inch too narrow. It didn’t cover the entire top of the back legs. I checked my measurements over and over against the plans, couldn’t find the problem, and finally just cut a new piece that was a little wider. I don’t understand how there could be a bug in the plans after they made the video and didn’t catch it, but whatever. This works and it looks good.
There are a few things that look a little off if you are paying attention, but hey, most of the time you’re sitting in this chair you’ll be drinking a beer in the sun. It’s plenty good for that and very comfortable. Mission accomplished!
I still need to figure out how I’m going to finish this (or if I’ll just leave it bare). After that, the next step is to redo it all over again so that we have two. It should go MUCH faster this time since I already have all the templates. Plus, I feel confident that I can cut all the pieces first and then assemble them. The plan is very forgiving about pieces being off by an 1/8″ here or there and not having a huge effect on the outcome (for the most part.)
